Polycapillary optics xrf analysers
MICROSCOPIC SPOT COATING THICKNESS AND MATERIAL ANALYSIS
Nowadays, there’s a continuous growth in demand for much stricter quality measures in manufacturing and goods-in inspection. Whether you are required to check crucial miniature components in your manufactured parts or need to routinely test tiny sections in the incoming goods from various suppliers, our range of Polycapillary XRF-μ systems offer highly accurate coating thickness evaluation and extremely precise material analysis in small (down to 20 micron) measurement spots.
XDV®-μ

Measurement of extremely thin multi-layer coatings on very small components
XDV®-μ PCB/Wafer

Automated coating inspection system on PCBs and Wafers with vacuum suction
XDV®-μ Semi

Fully automated coating inspection system for semiconductor industry
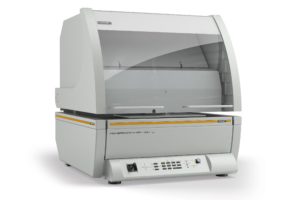
The XDV-μ series is Fischer’s most advanced X-ray fluorescence (XRF) instrument which is designed for precise coating thickness measurement and material analysis on very tiny structures, in extremely localised measurement spots. All devices are equipped with polycapillary optics what allows to focus the X-ray beam down to 20 μm (Full Width at Half Maximum – FWHM). The high intensity of polycapillary optics dramatically reduces measurement time while obtaining a much better precision than regular XRF.

The XDV-μ series offer a range of filters, voltages and currents to measure complex applications with up to 24 coating layers and elements. Furthermore, all XDV-μ models are equipped with a programmable XYZ stage and a truly unique pattern recognition software. These features allow your measurement tasks to be fully automated, without any additional programming experience. Nevertheless, the top of the range XDV-μ Semi additionally comes with sample handling unit, allowing completely hands-free operation.

Programmable XYZ stage allows to precisely focus in the region of interest and fully automate measurement tasks

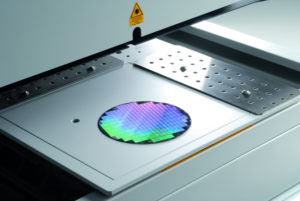
Sample handling unit (Wafer handling in the example above) allows completely hands-free operation
Powerful Silicon Drift Detector (50mm2 effective area) and new digital pulse processor (DPP+) detects and processes very-high count rates across a wide range of materials Al(13) to U(92). This dramatically reduces the measurement time and significantly increases the resolution and accuracy of the readings. Meanwhile, micro-focus X-ray tube with tungsten target and beryllium window ensures long-lasting service for many years. The necessity of re-calibration is drastically reduced, saving time and effort as all instruments are calibrated to your specific applications before the delivery.
FISCHERSCOPE® X-RAY XDV®-μ Features and Benefits
- Powerful bench-top instrument for the non-destructive analysis of extremely thin coatings.
- Highly small aperture size (down to 20 μm) allows to focus and measure in exceedingly small spots.
- High resolution detector gives a much better elemental separation in comparison to traditional detectors.
- Extremely safe. Thick metal shielding fully protects operators and visitors from hazardous X-ray energy.
- Doesn’t require any sample preparation and outputs precise results with average test times of 5 seconds.


- Programmable XY-Stage and Z-Axis can be automated to measure in predefined positions what allows seamless routine measurements, repetitive and accurate results.
- Precise recognition of low intensity elements accommodates for repetitive and accurate:
- coating thickness measurements in nanometers range (e.g. as low as 2nm of Gold).
- small concentrations in the trace analysis to RoHS &WEEE
- Various complex geometry samples can be tested in specific regions thanks to the top down measurement.
- Big samples can be allocated thanks to the spacious chamber with the usable sample placement area of 370x320x40mm.
- WinFTM software for seamless measurements, data collection and processing comes pre-installed on PC or laptop.
- Instant results, automated data storage and labelling allows a high throughput of samples.
FISCHERSCOPE® X-RAY XDV®-μ Applications
- Precise coating thickness evaluation of Gold, Palladium and Nickel layers on Copper in PCB applications.Simplifying quality control on PCBs with automatic pattern recognitionD
- Simplifying incoming good inspection and quality assurance on PCBs with automatic pattern recognition.
- Directly measurable concentrations of phosphorous content in Electroless Nickel applications
- Analysis of the metallic content in plating solutions, such as AuCuCd, AuCuIn, RhRu to ensure an even colour finish.


- Analysis of harmful substances textiles for Oeko-Tex certification
- Trace element analysis (mainly led and cadmium) in materials for fashion jewellery and accessories
- Identification of undesirable substances (e.g. heavy metals) in electronics, packaging and consumer goods to RoHS, WEEE, CPSIA and other guidelines.
Materials Identification
Material analysis is achieved using the XRF method and Fischer’s range of instruments have the capability to identify unknown materials. The ‘Material ID’ function is easily configured to identify an unknown sample by comparing the spectrum with a library of stored reference spectra. The library can be edited and customised by the user to incorporate known materials and utilised for ‘goods in’ testing for example.

Plating Solution Testing
The quality of metallic coatings depends heavily on the formulation of the plating bath solution, which consequently needs to be monitored. Compared with other methods like titration, XRF analysis of such solutions is straightforward.
Sample preparation and XRF testing is quick, and clean as opposed to other analytical methods where gases (Ar) or purified water are used. These can be messy, time consuming and the results subjective.

WinFTM Software
The supplied Fischer WinFTM software has full SPC (Statistical Process Control) functionality for optimisation of measurements and control of quality throughout the manufacturing process.

Reporting
All Fischer X-ray instruments are supplied with a fully-featured software package that includes a report editor module.
Optimise your workflow, save time and resources, and professionally present the measurement data to your customers. Simply create a template and report your test results directly from the instrument.
Incorporate tables, charts, pictures, spectra, and statistical data into a professional document with your company logo. With one click of a button, the report can be printed as a ‘certificate of testing’ to accompany the goods. The final results can also be exported to Excel, CSV, and PDF formats.

Training
You will have received an onsite installation training session when the machine is commissioned. This is designed to get you up and running.
Many customers, however, request additional training after a few weeks or months – because usually, questions relating specifically to their measurement application and production activities arise sometime after they start using the X-ray.
Also, with time, the original operators may leave the company, and a proper handover of knowledge relating to the instrument does not occur – so invariably key information gets forgotten or its importance diluted.
Make sure you keep trained, informed, and knowledgeable about your X-ray and of its capabilities.
Technical support, advice, and information are free: call our applications support line and speak directly with a Fischer technician.
Service and Applications Support

Your application challenges are our prime focus. We’ve built two state-of-the-art laboratories in Lymington and Nottingham, where our technical experts with more than 25 years of experience are eager to help you. We’re always available to assist you with choosing the right instrument, developing a new measurement approach, testing samples, defining an appropriate application, and creating a compelling case study or a report to prove your ideas.
At the same time, our service department ensures almost an instant response to any of your requests, with an average turnaround time of 48 hours to resolve outstanding issues and enough engineers in your area who are available to travel on-site to support you.
Can’t purchase the instrument outright? It’s not a problem! With our highly trusted financial partner First Capital Finance Ltd., we offer to spread the cost of the instruments over three or five years. Contact us to learn more.

Fischer Instrumentation offers one year warranty on all of the instruments supplied. This fully covers you for any unexpected breakdowns or issues you may encounter.

